How to Use Writer Agent for Update Briefs
Written By Chioma Ugwu
Last updated 11 months ago
For a brief overview of Writer Agent, see the article: What is Writer Agent?
This guide explains how to use Writer Agent when you are working from an Update Brief. Update Briefs are designed to optimise existing live pages. They combine your page’s performance signals with competitor analysis, then surface targeted checklist items and direct answer suggestions you can apply with Writer Agent.
1. Optimise Using Inline Checklist Icons
Use inline checklist icons when you want to act on a single paragraph, heading, or section right where it appears in the editor. This is the fastest, most targeted way to implement Update Brief suggestions.
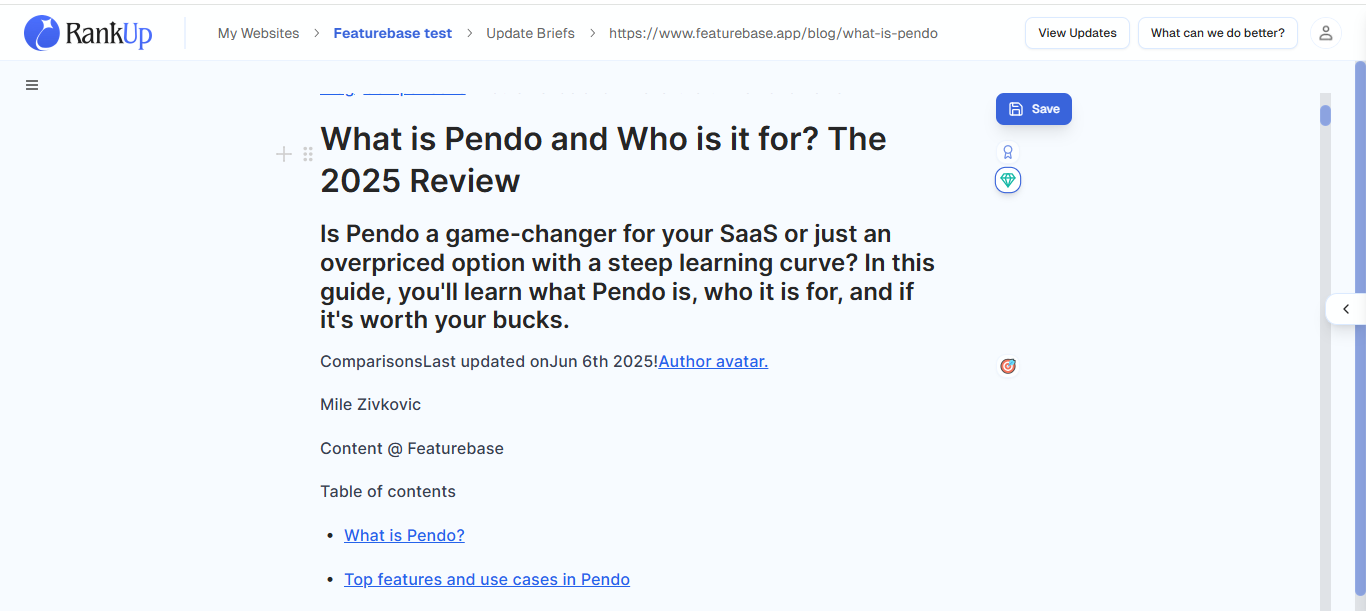
Step 1 - Open the Update Brief in the Editor
When you open an Update Brief, the editor displays the live page content.
Look for the small checklist icon next to a paragraph, heading, or section.
Step 2 - Open the Writer Agent Pop-up
Click the checklist icon. For Update Briefs, the types of checklist items are:
Keywords: The main search terms and related phrases your content should cover, based on what’s driving results for competitors.
Direct answers: Improves headings and responses to ensure they give the clearest, most direct answer possible, making them easier for AI and search engines to pick up.
SEO Best Practices: Enriched SEO checklist with exact writing suggestions.
AI Suggestions: Gap-filling ideas and improvement tips from competitive analysis.
Unique Angle: Suggestions to make your content stand out from similar posts.
AI Overview Optimisation: Steps to help your content appear in Google’s new AI-generated summaries.
SERP Features: Opportunities to show up in special Google results like answer boxes or “People Also Ask.”
Internal Link Opportunities: Pages to link to this page for better authority.
The Writer Agent pop-up opens with the relevant checklist item pre-selected for that location (for example: “Optimise main keyword placement in H1 title”).
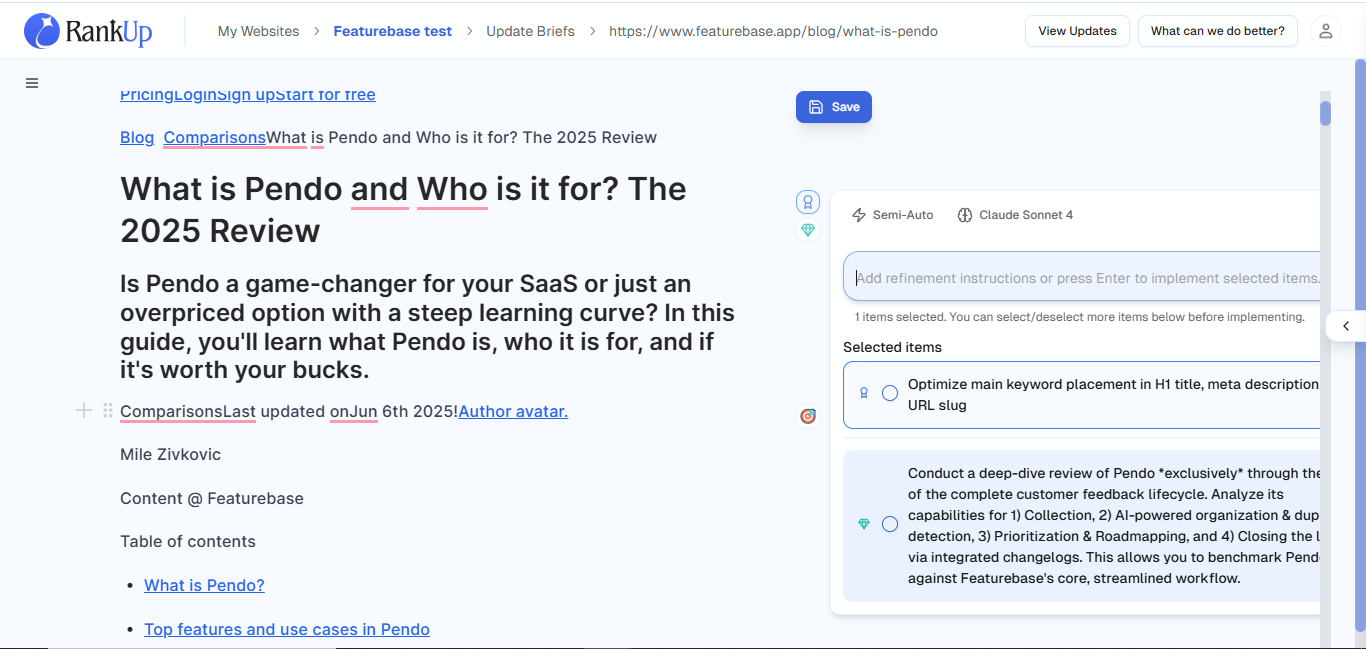
Step 3 - Add Brief Instructions
In the pop-up, add any short instructions that matter for this location, e.g.:
“Keep this direct answer under 40 words.”
“Make the tone more formal.”
“Include the primary keyword once.”
Step 4 - Choose a Context Engineering Mode
Quick Edit: Best for small rewrites and microcopy.
Full-Auto: Implement the checklist item in the content immediately.
Semi-Auto: Review the suggested context plan before running the task.
What to Review and Edit In Semi-Auto Mode
When RankUp proposes a context plan in Semi-Auto, check and edit these items before approving:
Research queries: Are the suggested research queries specific enough for this task? Add or refine queries if you need better or more relevant sources.
Style guides: Are all relevant style guides included? Add or remove brand guidelines if needed.
Checklist selection: Are the right checklist items included? Remove irrelevant items or add any missing ones.
Prompts: Would adding a short prompt improve the output (e.g., “remove unnecessary fluff”)? Add it now.
After you edit, approve the plan, and let the agent run the tasks.
Step 5 - Run and Review
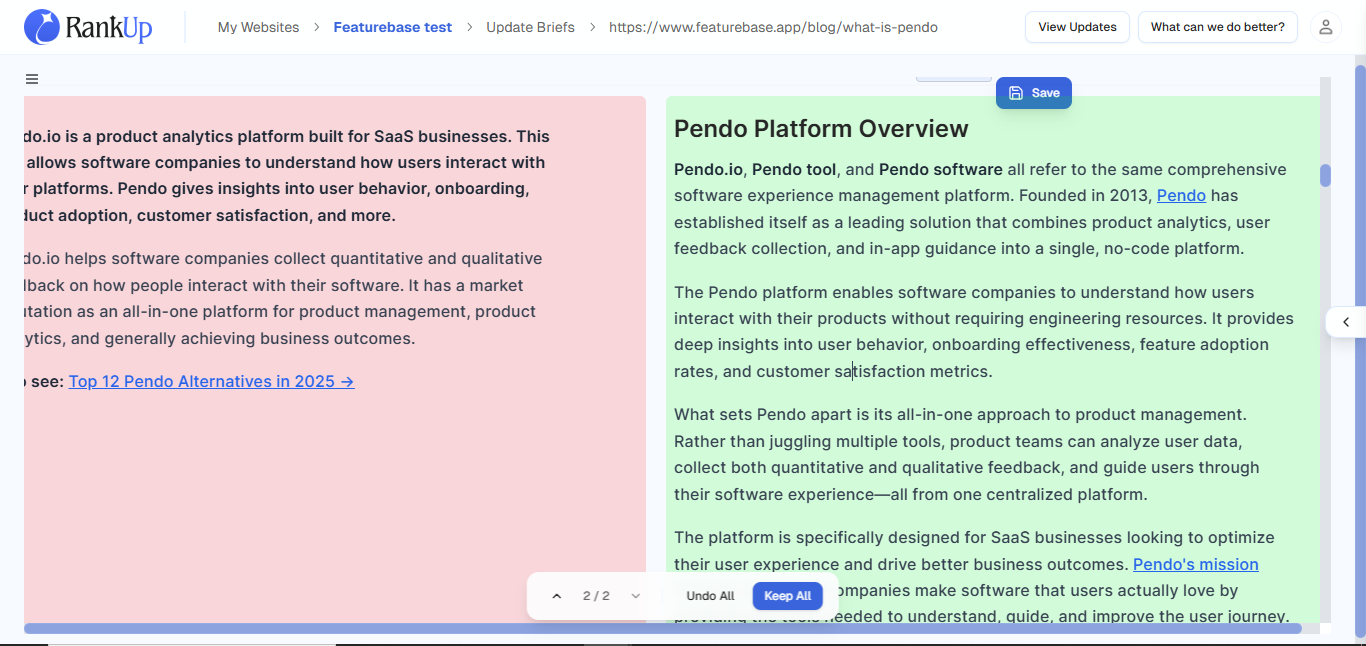
Click Send to run the task. Depending on the mode, output appears immediately or after plan review and processing.
Writer Agent shows the change as a Before/After Block in the editor.
Accept, tweak with Quick Edit, or reject the change.
💡Tip: Inline icons are ideal for single, focused actions, like direct answers and short rewrites. If you need several edits across a section, use the section-by-section flow instead (See below).
2. Optimise Content Section by Section
When you want to refine parts of your article without rewriting the whole thing, section-by-section editing is the most efficient approach. This allows you to strengthen weak areas, update outdated information, and incorporate new keyword opportunities while keeping the rest of the article intact.
Step 1 - Select the Section You Want to Update
Start with your Update Brief open in the editor.
Highlight the section from the brief.
Click Add to Chat (Cmd/Ctrl + L).
The Writer Agent sidebar opens with your selected section in the chat.

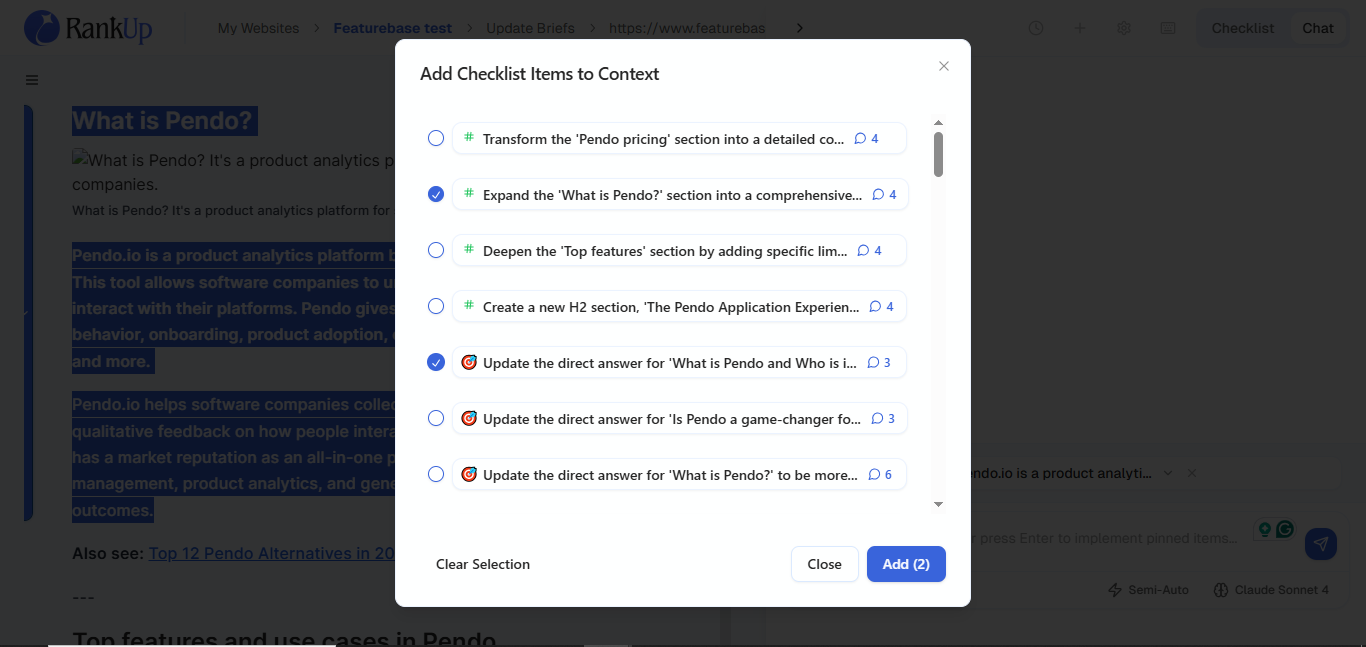
Step 2 - Add Checklist Items
Click the + button in the chat sidebar.
Add checklist items relevant to the current section to keep the Writer Agent focused.
💡Tip: When working with Update Briefs, the goal is to refresh and strengthen content that’s already live. To achieve this, the most valuable checklist types to prioritize are Direct Answers, Keywords, Best Practices, Suggestions, and SERP Features. These ensure your content stays competitive in search, aligns with current intent, and is optimized for both AI systems and rich SERP visibility.
Step 3 - Add Any Extra Instructions
Examples:
“Keep this section 150 to 220 words.”
“Make this paragraph match the tone of the intro.”
“Add a short, direct answer sentence that includes the query phrase.”
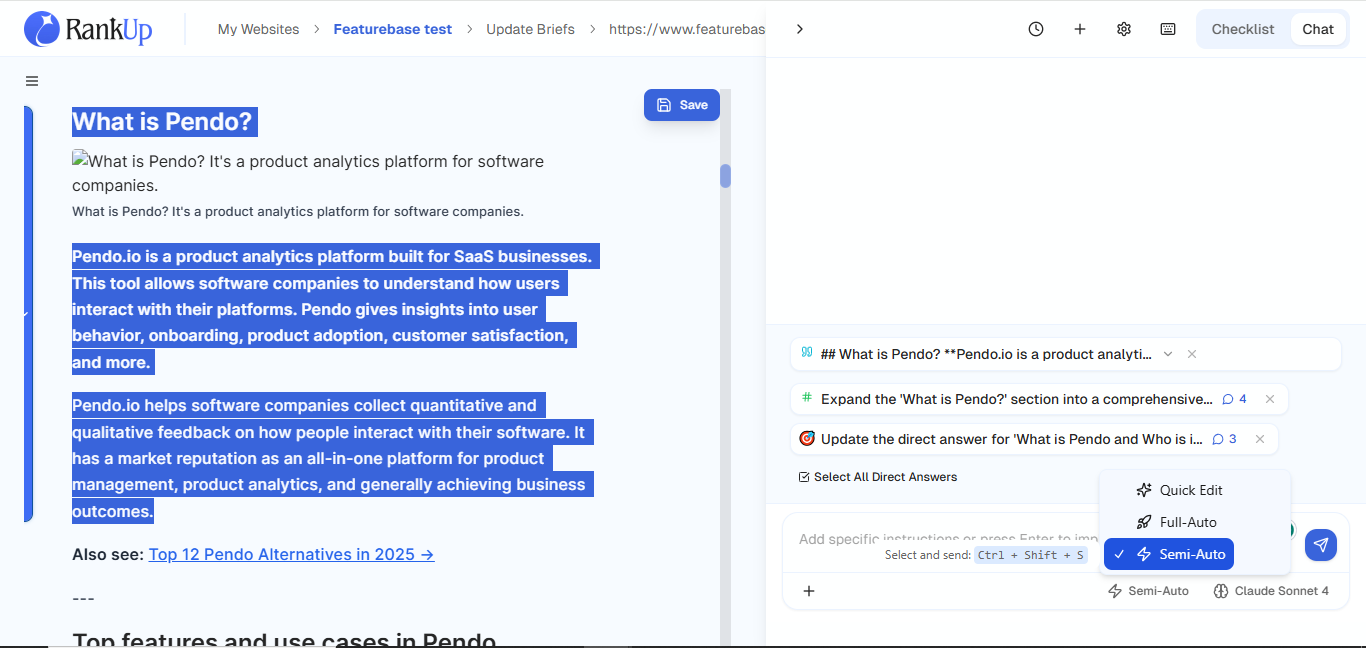
Step 4 - Pick Your Context Engineering Mode
Full-Auto - RankUp builds and runs the full context plan. Best for quick, hands-off edits. (Note: This process can take one to two minutes if you’re running multiple tasks simultaneously.)
Semi-Auto - RankUp suggests a task breakdown and context plan for each task. You can review and adjust the plan, then approve to run.
Quick Edit - Output is generated immediately. Best for micro tweaks and short rewrites.
Step 5 - Generate and Review
Click Send.
Review the Before/After Block to see what changes have been made.
You can either accept the changes, refine with Quick Edit, or re-run with new checklist items.
3. Bulk Apply Checklists
Instead of only applying checklist items inline or section-by-section, you can also select multiple checklists to apply at once across the entire article. This is useful when you want to quickly enforce consistency across the full article, like ensuring best practices, SERP features, or keyword usage are applied in every section.
Step 1 - Open the Checklist Panel
With your draft open in the editor, look to the right-hand panel.
Switch to the Checklist tab.
Step 2 - Choose Checklist Items
Use the multi-select option to add all the checklist items you want applied across the article at once to the chat. For example, you can add all direct answer items to the chat.
Step 3 - Include Any Additional Instructions
Examples:
“Rewrite the conclusion.”
“Make the article match the tone of the intro.”
Step 4 - Choose Your Mode
Full-Auto
Semi-Auto
Quick Edit
💡 Tip: To achieve the best output, use the Semi-Auto mode to ensure that no irrelevant research or context is included before approving.
Step 5 - Run and Review Changes
Click Send to run the task.
Review the Before/After Blocks to see the changes made.
Accept, tweak with Quick Edit, or reject and re-run with new checklist items.
Pro Tips and Keyboard Shortcuts
Quick tips and actions to speed up your workflow
Text Selection Actions
Add to Chat: Cmd/Ctrl + L
Open Al assistant: Cmd/Ctrl + J
Add selected text to examples collection: Cmd/Ctrl + Shift + E
💡 Tip: Use packed checklist items like “Provide more details per section” one at a time in the chat. Packed checklist items have comments that specify subtasks and edits in multiple locations, and applying multiple at a time might overcrowd the prompt and affect the quality of the output.
AI Actions
Quick Edit mode → Send: Cmd/Ctrl + Shift + Q
Full-Auto mode → Send: Cmd/Ctrl + Shift + F
Semi-Auto mode → Send: Cmd/Ctrl + Shift + S
Approve all tasks (Semi-Auto): Cmd/Ctrl + Shift + A
💡 Tip: After generation, verify facts, dates, and citations manually. Writer Agent helps draft faster, but does not replace subject-matter review.
Diff/Before-After Block Management
Accept all changes: Cmd/Ctrl + Shift + Enter
Reject all changes: Cmd/Ctrl + Shift + Backspace
Navigate to previous diff: Option/Alt + ⬆️
Navigate to next diff: Option/Alt + ⬇️
Editor
Save document: Cmd/Ctrl + S